A practical guide to images and colour modes in InDesign
4th March, 2016
Throughout this series of blogs we will be answering your questions relating to print ready artwork, helping you to avoid costly print delays.
Following on from our previous post which tackled the question ‘How do I create a print ready document?’ this post explains how to add print ready images into an InDesign document, and how to check whether your images are CMYK and high enough resolution for print using Photoshop. Through doing so we will answer the questions ‘Have I added images correctly?’ As well as, ‘What colour mode should my images be?’
Let’s start with the first question, ‘Have I added images correctly?’
When adding images into an InDesign document it’s best practice to create a frame first into which you place an image, this makes it easier to move an image around the page. Follow these steps to add a frame and insert an image:
1. As you can see from Figure 1 I have set up a print document with a title and placeholder body copy, and I’d like to add an image under the title, therefore I need to create a frame. Create a frame by selecting the Frame tool, either by simply pressing the letter ‘F’ on your keyboard or by clicking on the icon in the tools menu.
If you click and hold the Frame tool icon the Frame Tool menu will appear, allowing you to select either a rectangular, elliptical (oval) or a polygon shaped frame.
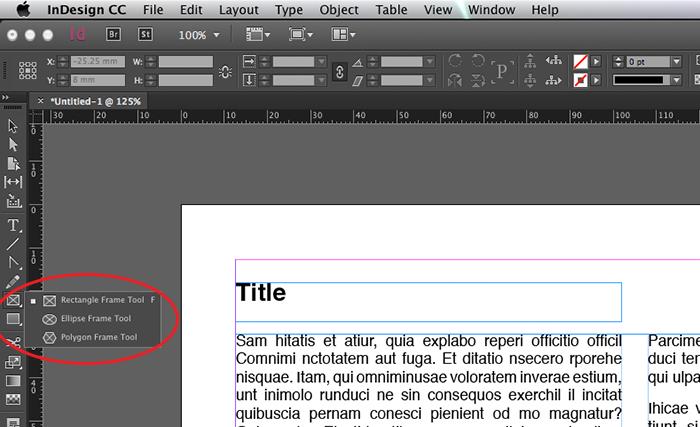
Figure 1: Frame tool menu
2. Selecting the frame tool you require (in our case a rectangle), click and drag across the document to place the frame at the size you want. You can change the dimensions afterwards by using the Selection Tool (Press ‘V’ or Esc or click on the Selection tool icon on the tools menu) and drag one of the corner squares (hold shift and drag to scale the frame proportionally).
Figure 2 shows the frame over the text, and if we were to add an image it would fill the space and cover the text. To move the text below the frame, make sure the frame is selected and click on the ‘Wrap around bounding box’ icon in the dock, if you hold down the Alt key at the same time as clicking on this icon it will bring up the Text Wrap dialogue box, which allows you to add space between the text and frame.
We’ve offset the bottom of the frame by 3mm to add a bit of breathing space in-between the frame and the body text (see Figure 3).
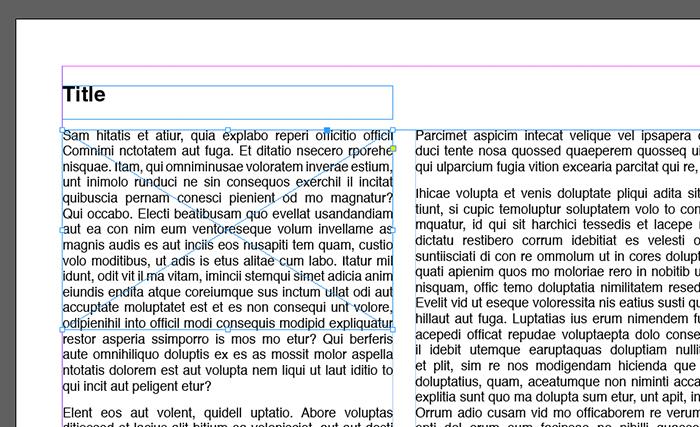
Figure 2: Frame position
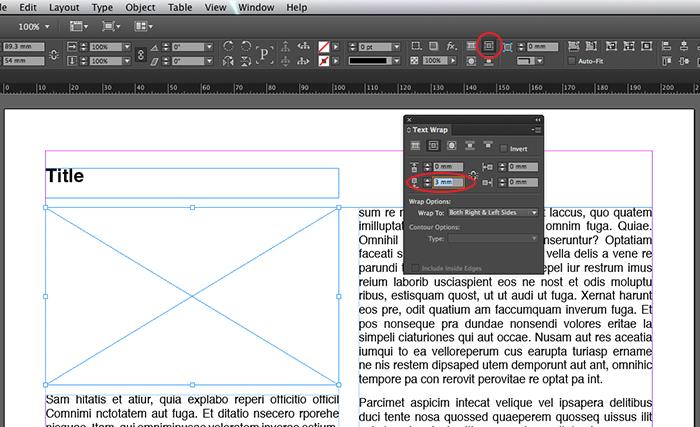
Figure 3: Wrap around bounding box icon and Text Wrap dialogue box
3. Before adding an image we’d suggest turning on Overprint Preview (View > Overprint Preview) and view your document at actual size (Cmd+1 on a Mac or Ctrl+1 on PC). This will give you an idea of how your document will look at the printed size, but bear in mind if you add a lot of images it’s advisable to turn Overprint Preview off otherwise your InDesign document will grind to a halt and crash!
To add an image, make sure the frame is still selected and either use to the shortcut Cmd+D on a Mac, or Ctrl+D on a PC, or File > Place, before locating the image you want to add and clicking Open. Your selected image will appear as a thumbnail above your cursor. Click the frame to place your image.
4. Figure 4 shows an image we’ve added from our server (bear in mind that if the server goes down the link will be broken. We’ll explain later how to avoid this by packaging your document files). As you can see, the image we have used is slightly too large for the frame, this is because InDesign places images at actual size. This can be helpful as it flags up if an image you’re intending to use is too small.
For raster images, such as photos, remember this rule of thumb: Use images that are 300 PPI (pixels per inch - also referred to DPI - dots per inch) at no larger than their actual size. For example, a 300 PPI image that is 10cm x 10cm will print best if it’s placed at 10 x 10cm or smaller.
If you place the image and scale it up to twice its original size, you essentially reduce its resolution to 150 PPI, resulting in a less detailed image that may look pixelated. If you have copied an image from the web it will most likely be too low in resolution to print, as web images are usually around 72 DPI, and images for print should be 300 PPI or higher. We cover how to check the resolution and colour mode of your images at the end of this blog.
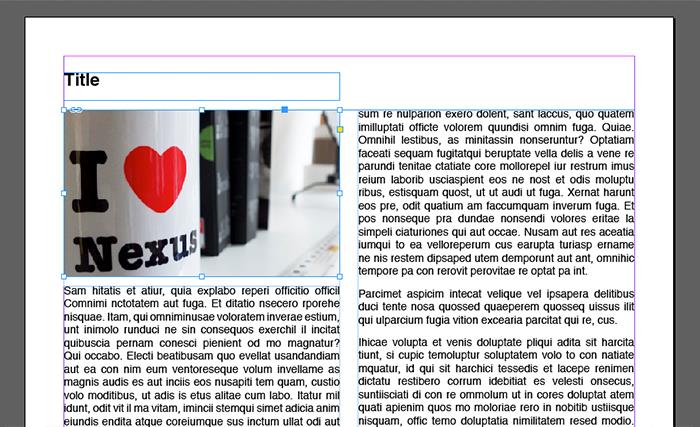
Figure 4: Adding an image into the frame
5. The easiest way to resize a large image is by using the Fitting options. You can do this by selecting ‘Fit content proportionally’, which fits the entire image inside the frame, but if the frame is not the same ratio as the image, parts of the frame will be left empty (see Figure 5). Another way to resize a large image is to ‘Fill frame proportionally’ which fills the frame with the image, but some of the image will be invisible outside of the frame if the frame is not the same ratio as the image (See Figure 6).
To select ‘Fit content proportionally’ you can either click on the icon in the dock or use the shortcut Shift+Alt+Cmd+C on a Mac or Shift+Alt+Ctrl+C on a PC. If you’d rather use the fitting option ‘Fill frame proportionally’ you can either click on the icon in the doc or use the shortcut Shift+Alt+Cmd+E on a Mac or Shift+Alt+Ctrl+E on a PC.
For finer control, select the image using the Direct Selection tool (Press ‘A’) and move the image around inside the frame with the mouse or the arrow keys for very fine (but slow) control.
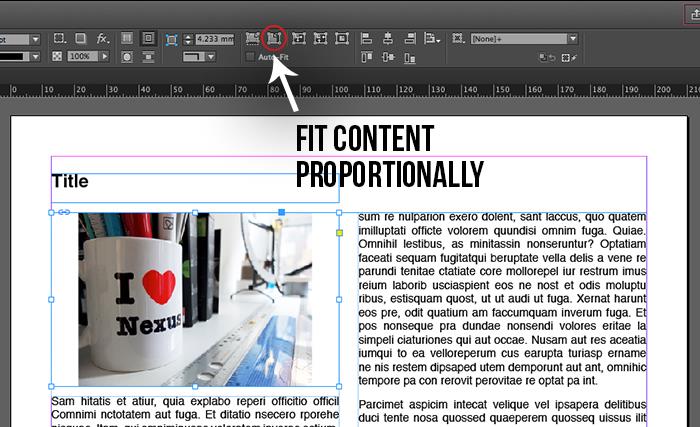
Figure 5: Fit content proportionally icon
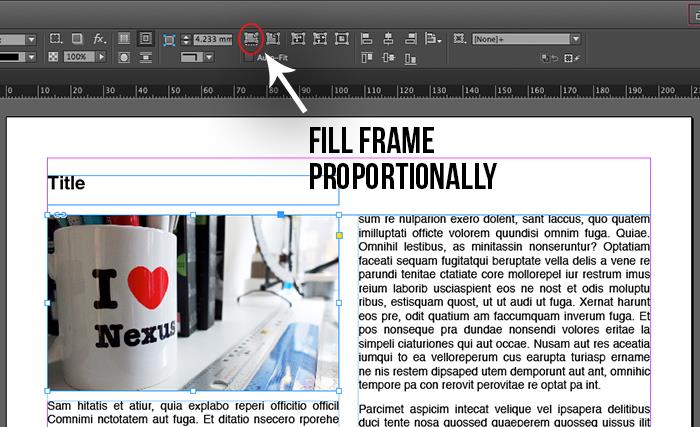
Figure 6: Fill frame proportionally icon
6. Now to explain how to package your InDesign document. We do this to collect all of the fonts and images you’ve used into a single packaged folder, because the image you’ve placed in your design is linked to an image stored elsewhere, and if that image is deleted or moved to a different folder it will become a missing link and will not print correctly.
To package your document go to File > Package, then click Package and decide where you want to save the folder. InDesign will more than likely flag up that your images are RGB, which is a suitable colour mode for the web but not for print. Print images need to be CMYK.
7. Once you have packaged your artwork and it has flagged up that your images are RGB, you can check which images are RGB by using the shortcut Shift+Cmd+D on a Mac and Shift+Ctrl+D on a PC to bring up the Links menu.
Click on each image thumbnail and open the link info drop down below it, which details the image’s colour mode, resolution and more. If the image is RGB and below 300 DPI, right click either the thumbnail in the links panel or on the image in your document and select Edit With > Adobe Photoshop, doing so will open your image in Photoshop.
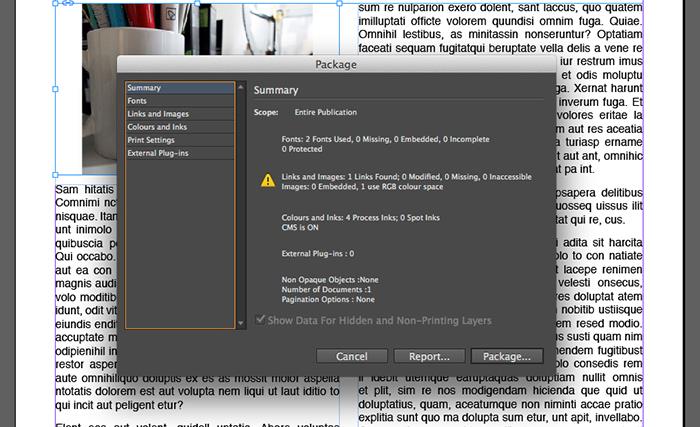
Figure 7: Warning triangle - showing that the image is RGB
8. Photoshop allows you to check the colour mode and resolution of images easily. In Photoshop you’re able to manually ‘up’ the resolution of images, although this process wont magically add definition - a low resolution image will still appear pixelated when enlarged, but ‘upping’ the resolution will enable it to be printed.
To check the resolution of an image follow these steps:
1. Click Image > Image size
The Image Size menu shows the Width and Height of the image as well as it’s Resolution (see Figure 8).
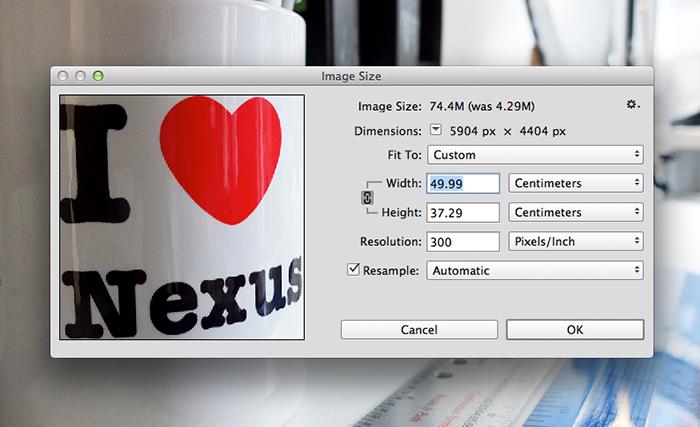
Figure 8: Image Size dialogue box
2. Up the resolution to 300 PPI if it’s not already. The preview window will update to show the image at 300 PPI. To get an idea of how it will print if placed at actual size click OK and Cmd+1 on a Mac or Ctrl+1 on a PC to view the image at 100%.
A quick way to check what colour mode your image is set to is to look at the document tab on the Application Frame (see Figure 9). If you need to change your image from RGB to CMYK. Click Image > Mode > CMYK Colour.
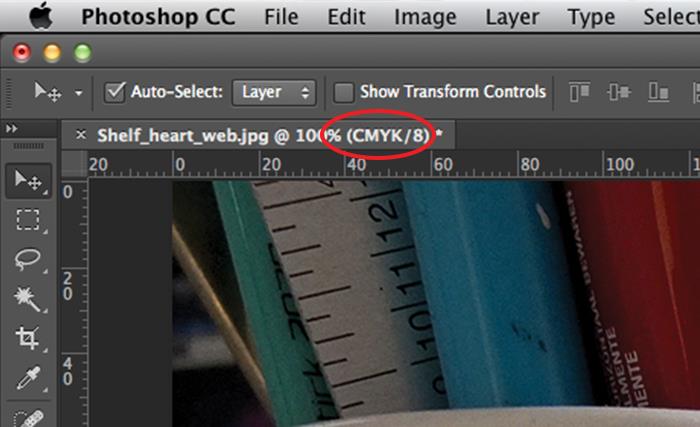
Figure 9: Image colour mode
If you have packaged your file as per Step 6 you can overwrite the image when saving it, doing so will automatically update the images in your InDesign file, to an image which should be suitable for print; with a minimum resolution of 300 PPI (depending if the image has been scaled) and CMYK.
We hope you have found this blog helpful and you can now confidently add images to your InDesign file, whilst checking that they are high enough resolution for print and CMYK rather than RGB. If you have any questions please comment below or call us on 01273 702525.


Comments
comments powered by Disqus