How to set up a print ready document
25th February, 2016

Throughout this series of blogs we will be answering your questions relating to print ready artwork, helping you to avoid print delays and needless mistakes.
Last week we discussed the best programs to use for creating your artwork - in this edition we will be asking:
How do I create a print ready document?
Now, we get it, if you are not used to using Adobe platforms, just opening the program can feel like quite a minefield.
The first stumbling block that many of our clients face is knowing which options you require when you open a a new document.
You'll be faced with a whole load of options; you’ll need to select the correct size, colour mode and possibly add bleed. Don’t worry if this sounds daunting because this blog explains how to do so! Hurrah!
Firstly I’ll explain how to open a print document in the three of main Adobe design programs. I will also include a few helpful shortcuts. Simply click on your preferred software from the list below:
- Adobe InDesign -
- Adobe Illustrator -
- Adobe Photoshop -
If you use a different design program such as CorelDRAW Graphics Suite or QuarkXPress and have any questions, feel free to give us a ring on 01273 702525 and we’ll be happy to help.
1. Let’s get started by setting up a print ready document in Adobe InDesign CC
Launch InDesign and create a new document (Ctrl + N on a PC or Cmd + N on a Mac). The New Document options include three Intent settings: Print, Web and Digital Publishing.
NB By selecting ‘Preview’ (bottom left of the New Doc dialog box) you can view the document and see the changes you make to the document before committing. (see figure 1.)
2. Select the Print option (see Figure 1). Figure 1: In InDesign’s New Document dialog box, select the Print intent and preview your document
3. Your document’s size must match the exact dimensions of the final project. The ‘Page Size’ drop down menu has several pre-programmed sizes (see Figure 2). Otherwise you can manually enter the dimensions of your document you are creating in the ‘Width’ and ‘Height’ boxes.
4. At this stage it is advisable to add a 3mm Bleed.
But what is a bleed I hear you ask?
By definition, Bleed is simply a printing term that refers to graphic or design elements (such as images or a wash of colour), which extend beyond the edge of a document. Bleed ensures that no unprinted edges occur in the final trimmed document.
Move to the ‘Bleed and Slug’ section at the bottom of the dialog box. Here you can to type in the dimensions of the bleed you require. To avoid having to repeat this for each side of the document, just hit the link icon and you’ll just have to enter a single measurement and the rest will follow suit. It is good practice to always put a bleed on your document.
NB you’ll know when it is linked as the icon will appear to be in a dark grey box. By ticking preview again (at the bottom left) you will see the red border appear.
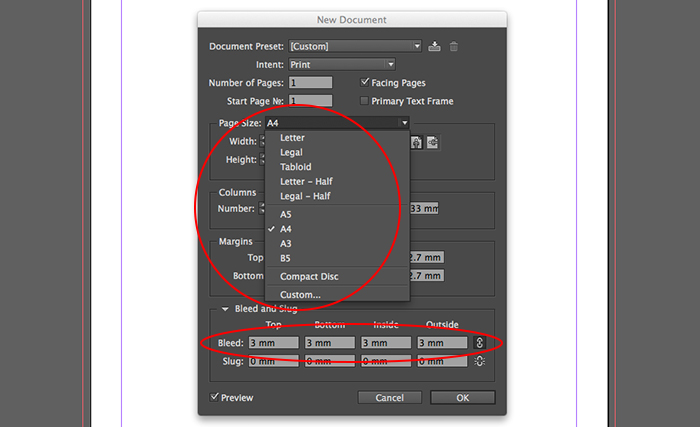 Figure 2: Page Size and Bleed options
5. Click OK. Success!
If, when come to print your artwork your have images or a background colour’s that run into the bleed area, you’ll need to export your artwork with crop and bleed. We will discuss this in greater detail in the upcoming blog.
How to set up a print ready document in Adobe Illustrator CC
Launch Illustrator and create a new document (Ctrl + N on a PC or Cmd + N on a Mac). When creating an Illustrator document for print make sure you open the advanced settings and set the ‘Color Mode’ to CMYK and ensure ‘Raster Effects’ are set to High (300 ppi). (See Figure 1)
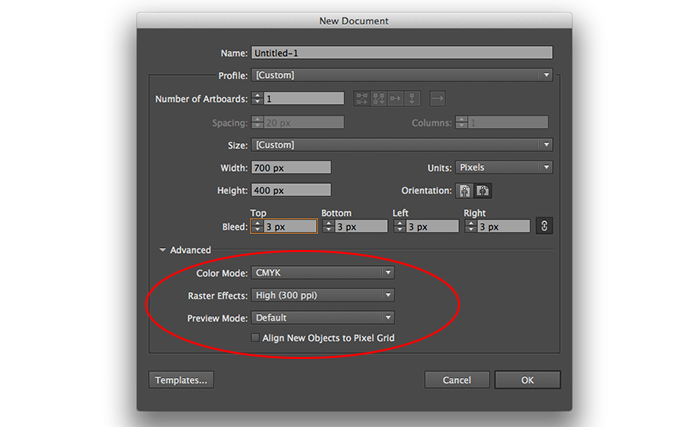 Figure 1: Advanced settings in Illustrator
2. Name your document with a title relating to the job/client so it’s easy to locate at a later date.
3. Enter the amount of artboards (work areas) you think you'll need (you can easily add more once the document is created).
4. Your document’s size must match the exact dimensions of the final project. The Size drop down menu has several page sizes pre programmed; otherwise you can enter the dimension of the document you are creating in the ‘Width and Height’ boxes.
5. It is now advisable to add a 3mm Bleed around the document. You just need to type the dimensions of the bleed you require.
To avoid having to repeat this for each side of the document, just hit the link icon and the rest will follow suit. NB you’ll know when it is linked as the icon will appear to be in a dark grey box. It is good practice to always put a bleed on your document.
By definition, Bleed is a printing term that refers to graphic or design elements (such as images or a wash of colour), which extend beyond the edge of a document. A Bleed ensures that no unprinted edges occur in the final trimmed document.  Figure 2: Illustrator Bleed settings
6. Click OK. Success!
When you come to print, and you have images or a background colour that run into the bleed area, you’ll need to export your artwork with crop and bleed. We will explain how to do so in an upcoming blog.
In the next edition of ‘A practical guide to creating print ready artwork’ we will detail how to add images so they print correctly as well as the difference between CMYK and RGB.
How to set up a print ready document in Adobe Photoshop CC
Photoshop isn’t quite as well suited as InDesign and Illustrator when it comes to creating a print document. It is better suited to editing imagery and designing web based media, but there are work around’s you can use incase you only have Photoshop at your disposal and need to meet an urgent print deadline.
1.Launch Photoshop and create a new document (Ctrl + N on a PC or Cmd + N on a Mac).
2. Name your document with a title relating to the job/client so it’s easy to locate at a later date (see Figure 1).
3. Make sure your document’s size matches the exact dimensions of the final project. The’ Document Type’ drop down menu has several project sizes pre-programmed, otherwise you can enter the dimension of the document you are creating in the ‘Width and Height’ boxes (see Figure 1).
4. The Resolution needs to be 300 dpi and the Color Mode CMYK (see Figure 1).
5. Click Ok.
 Figure 1: New document panel in Photoshop
6. If you’re going to have imagery or a wash of colour up to the edges of your document, you will need to add bleed.
Bleed ensures that no unprinted edges occur in the final trimmed document. Unfortunately, as Photoshop doesn’t have an automated bleed option it has to be set up manually.
To add bleed follow these steps:
6i. Firstly make the rulers visible (Ctrl + R on a PC or Cmd + R on a Mac) and rulers should appear along the top and down the left hand side of the work area (see Figure 2).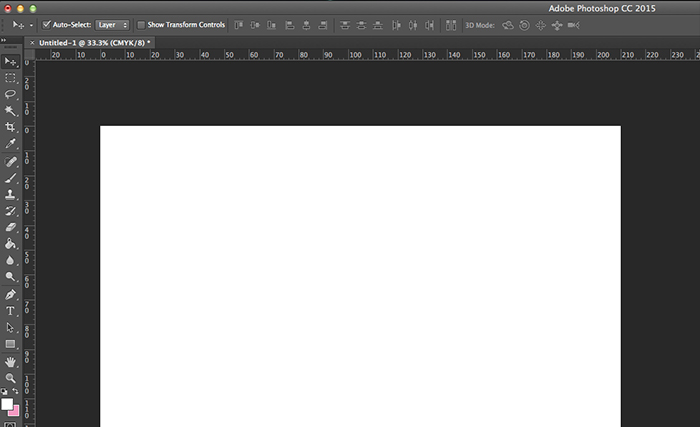 Figure 2: Add rulers to your work area
6ii. Draw 4 guides by dragging 2 down from the ruler at the top, and 2 across from the ruler on the left, they need to snap to each edge of the document (see Figure 3).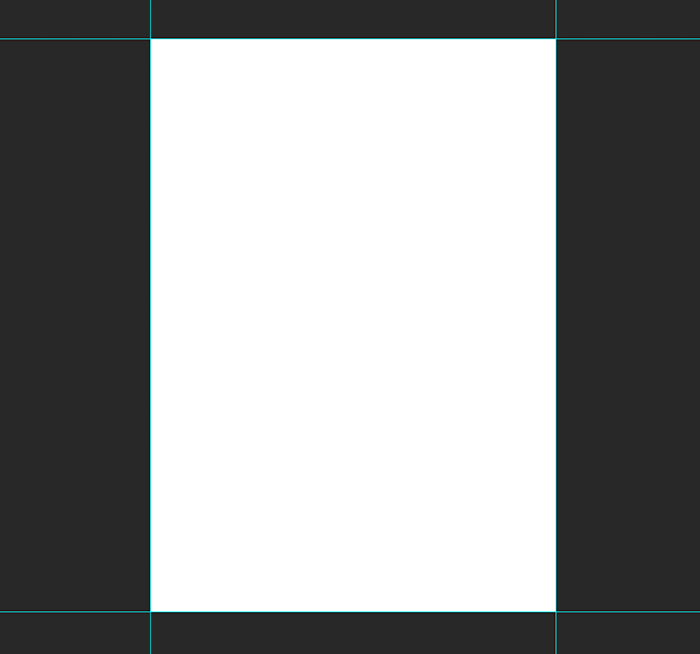
Figure 3: Drag guides to the edge of your document
6iii. Then go up to Image > Canvas Size and add 6mm to the ‘Width and Height’ of your canvas, which will add 3mm onto each side. N.B. Make sure the Anchor is set to “Centered” and click OK (see Figures 4 and 5).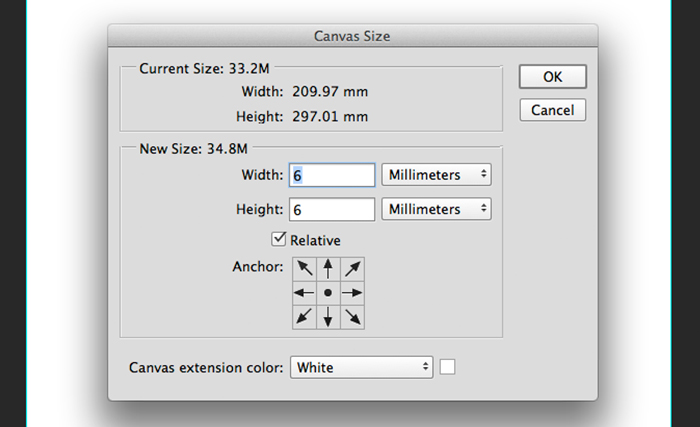 Figure 4: Enlarge the canvas to create the bleed area
Figure 5: Success!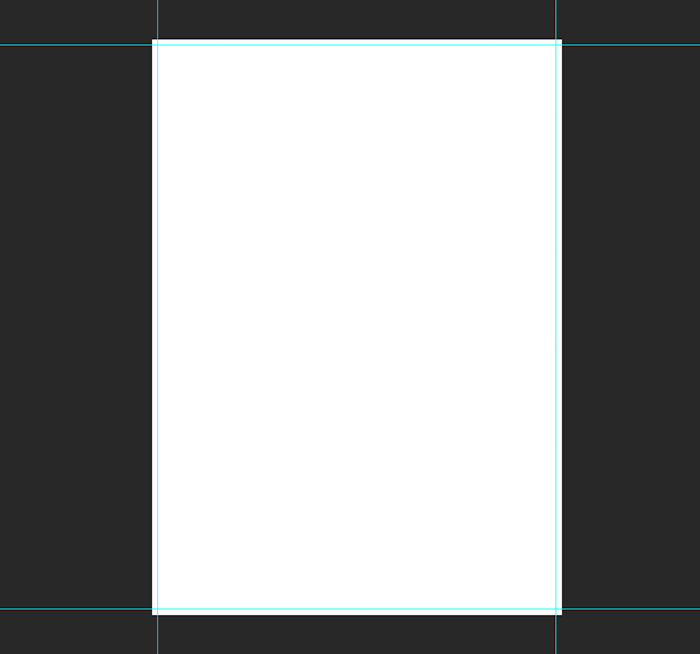
Figure 5: Success!
When you come to print, and you have images or a background colour that run into the bleed area, you can add print marks in either Adobe Acrobat or InDesign. We will detail how to do so in an upcoming blog that covers how to export artwork for print.
In the next edition of the series we will detail how to add images so they print correctly, as well as the difference between CMYK and RGB.


Comments
comments powered by Disqus